Enemy Detection
Run an enemy check
|
In addition, the following Authoring item type templates are not supported: Workspace, External QTI |
Enemy detection allows project managers to run an enemy check on a group of items. The results of a check will identify pairs of similar items that are potential enemies, and those pairs can be confirmed as enemies or non-enemies. (Pairs can also be ignored and not marked at all.) Project managers can specify which items will be evaluated and what similarity index (cosine) to analyze the items against. If two items are marked as ‘non-enemies’, the pair will be stored in the non-enemies database and will not be flagged in future checks unless either item is modified.
 Stop words can also be configured for the item bank to designate words that should not be used to compare items during enemy checks.
Add comparison parameters
|
|
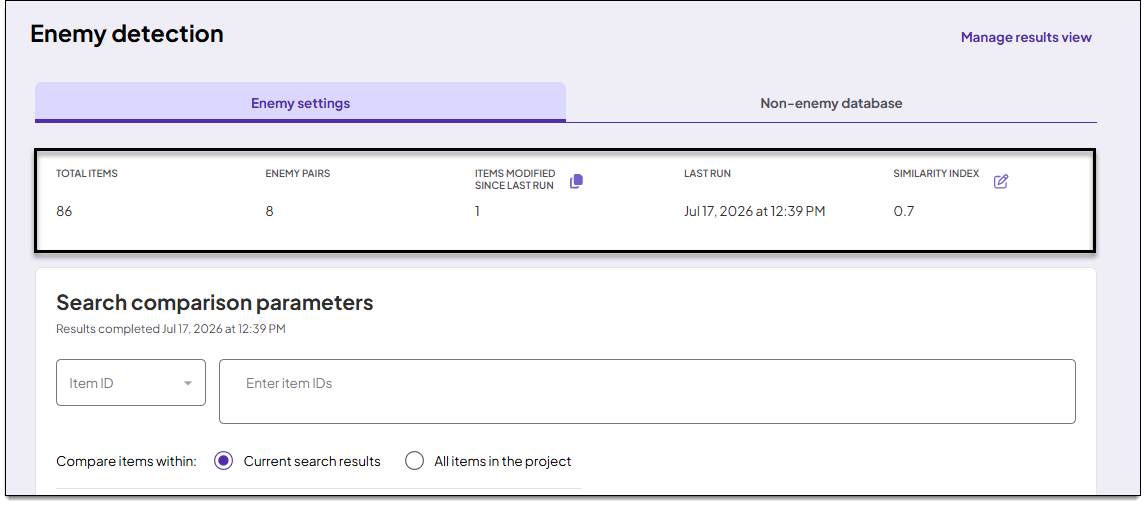
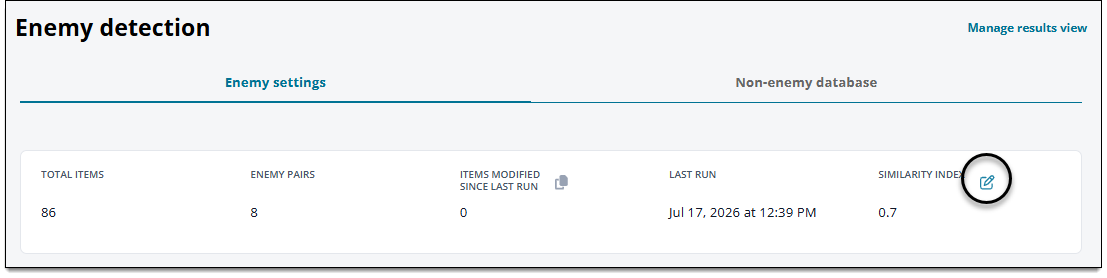
- (Optional) Review the summary at the top of the Enemy detection page and change the similarity index ↓ before you begin if needed. The summary shows the following details:
- Total items: The total number of items in the project.
- Enemy pairs: The total number of item pairs that are currently marked as enemies.
- Items modified since last run: The number of items in the project that have been modified since the last enemy check was run.
- Last run: The date and time when the last enemy check was run.
- Similarity index: The current value set for the similarity index ↓.
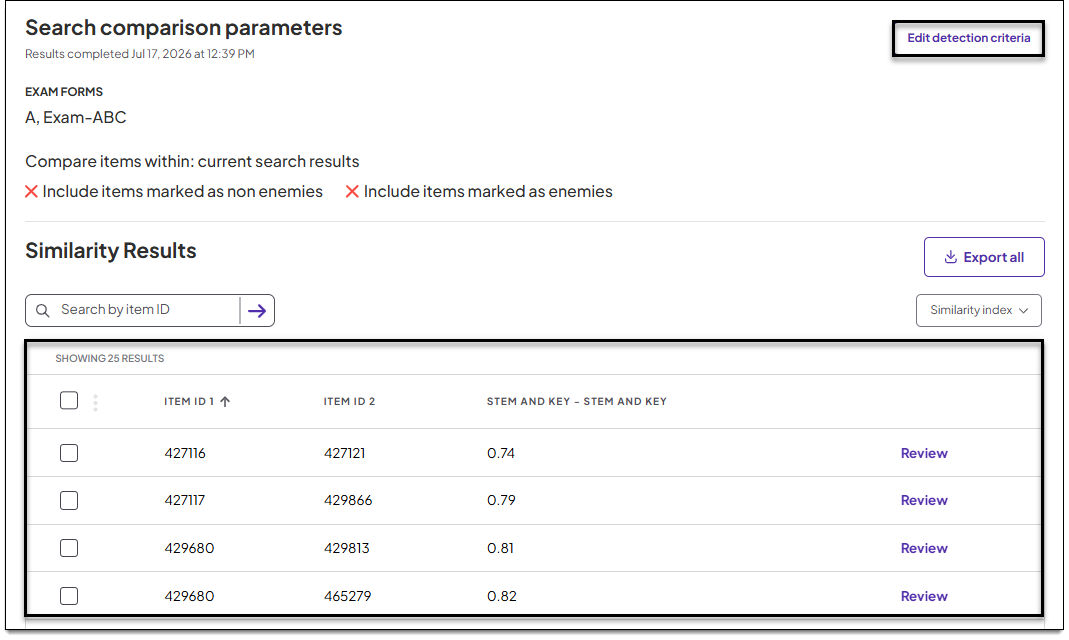
- If any pairs from a previous enemy check have not been resolved (marked as enemies or not enemies), you must review those pairs first. Or, click Edit detection criteria to start a new enemy check.
- Select a comparison type from the drop-down menu:
- Item ID: Compare specific items against other items.
- Exam form: Compare all items in one or more forms against each other. When you specify more than one form, all items from both forms will be pooled into a single set for comparison; they will not be compared at the form level. If the same item is included in more than one form it will not be flagged as an enemy of itself.
- Collection: Compare all items in one or more collections against each other. When you specify more than one collection, all items from both collections will be pooled into a single set for comparison; they will not be compared at the collection level. If the same item is included in more than one collection, it will not be flagged as an enemy of itself.
- Input item IDs or select exam forms or collections to be compared in the enemy check:
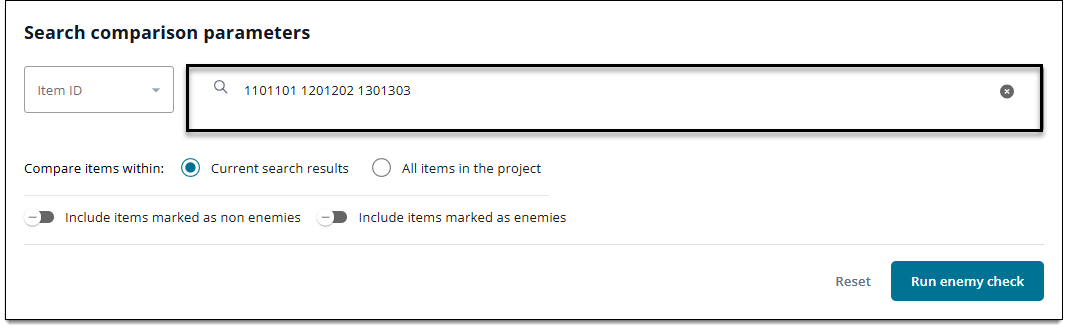
- Item ID: Type item IDs in the Enter item IDs field, separating each ID with a comma and/or a single space. You can also copy a batch of item IDs from the Search page and paste them into this field.
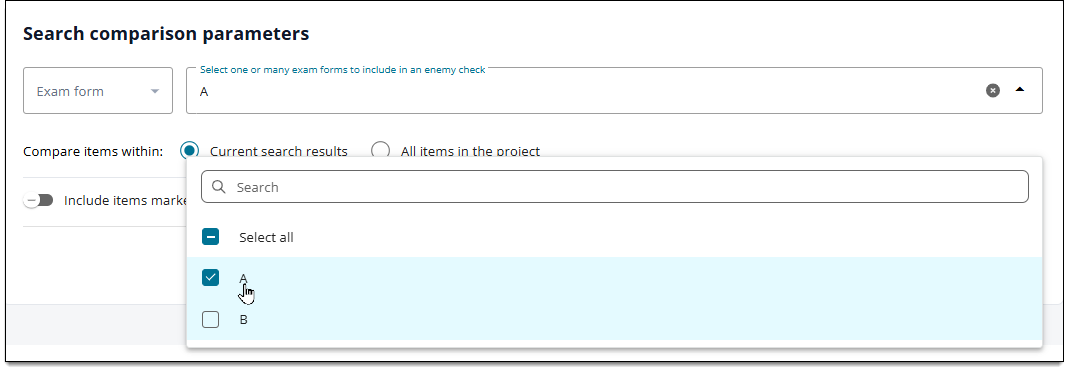
- Exam form: Click inside the search box to select one or more forms to include in the enemy check. You can also begin typing a form name to search for specific forms.
- Collection: Click inside the search box to select one or more collections to include in the enemy check. You can also begin typing a collection name to search for specific collections.
- Item ID: Type item IDs in the Enter item IDs field, separating each ID with a comma and/or a single space. You can also copy a batch of item IDs from the Search page and paste them into this field.
- Select an option for Compare items within:
- Current search results: All items (or items within forms or collections) that you defined in Step 4 ↑ will be compared against one another.
- Item ID example: If you run a check for items 12345 and 23456, those two items will only be compared against each other. If they are not enemies of each other, nothing will be returned in the enemy results.
- Forms/Collections example: If you run a check for Form A and Form B, all items in both forms are pooled into a single set and compared against one another.
- All items in the project: All items (or all items within forms or collections) that you defined in Step 4 ↑ will be compared against all items in the project.
- Item ID example: If you run a check for items 12345 and 23456, both items will be compared against each other as well as all other items in the project. The results would return any potential enemy pairs within the project where at least one item is either 12345 or 23456.
- If items 45678 and 56789 are enemies of each other but no other items in the project, the pair will not be included in the results since they are not enemies of either 12345 or 23456.
- Forms/Collections example: If you run a check for Form A and Form B, items from both forms will be compared against each other as well as all other items in the project. The results would return any potential enemy pairs within the project where at least one item in the pair belongs to either Form A or Form B.
- If items 12345 and 23456 are enemies, the pair will not be presented in the results if neither item belongs to Form A or Form B.
- Item ID example: If you run a check for items 12345 and 23456, both items will be compared against each other as well as all other items in the project. The results would return any potential enemy pairs within the project where at least one item is either 12345 or 23456.
- Current search results: All items (or items within forms or collections) that you defined in Step 4 ↑ will be compared against one another.
- (Optional) Select the toggles to turn them on
 or off
 . These options determine if items already marked as enemies or non-enemies should be ignored or included in the enemy check.
- Include items marked as non-enemies: The default is off ; items marked as non-enemies (in the non-enemy database) are not included in the enemy check.
- Turn this toggle on to include items that are marked as non-enemies in the detection check.
 If a new revision is saved for either item in a non-enemy pair, the pair will be automatically removed from the non-enemies database.
- Turn this toggle on
- Include items marked as enemies: The default is off ; items already marked as enemies are not returned in the results. For example, if item 12345 and 23456 are already marked as enemies and an enemy check is run for only those two items, nothing would be returned in the results.
- Turn this toggle on if you want to return all potential enemies, including items that are already marked as enemies.
- Content changes do not automatically trigger changes to the 'enemies' status for an enemy pair. If an item pair should no longer be marked as enemies, you must toggle this option on and review the item pair again to mark them as non-enemies.
- Turn this toggle on
- Include items marked as non-enemies: The default is off
- Click Run enemy check.
- If errors are found, they will be presented at the top of the page and the enemy check will be paused. Click Remove these items from search to clear any invalid items; then click Run enemy check again. Common errors include:
- one or more items are not editable in the project
- one or more item IDs are not valid
- one or more items use a template that is not supported (legacy editor templates, Workspace, External QTI)
- items were not all written with the same item editor (Authoring vs. legacy)
- When no errors are found, a progress page displays the status of the enemy check (e.g., "15/100 items processed").
- Once the enemy check is complete, the results are presented in a table.
- If no results are returned, you can click Edit detection criteria to modify the comparison parameters. No results may occur if:
- the items you specified were not flagged as enemies.
- the conditions set in Step 4 above ↑ prevented items from being returned in the results.
- there are no item pairs within the project that were flagged as potential enemies.
- If no results are returned, you can click Edit detection criteria to modify the comparison parameters. No results may occur if:
- You can now select and review item pairs to mark them as enemies or non-enemies, as described in the next section.
Review item pairs and mark as enemies or non-enemies
In the Similarity Results table, each row in the table displays the Item ID and their Similarity index. The similarity index can range from 0-1, where 0 implies no similarity between the items and 1 implies that the items are identical. Project managers can change the default similarity index ↓ that is used to determine which item pairs are returned in the enemy check results.
- If needed, sort the results list ↓ or filter the results by searching item IDs ↓.
- In the results table, open one or more item pairs for review:
- Select a single item pair to review and click Review at the end of the row.
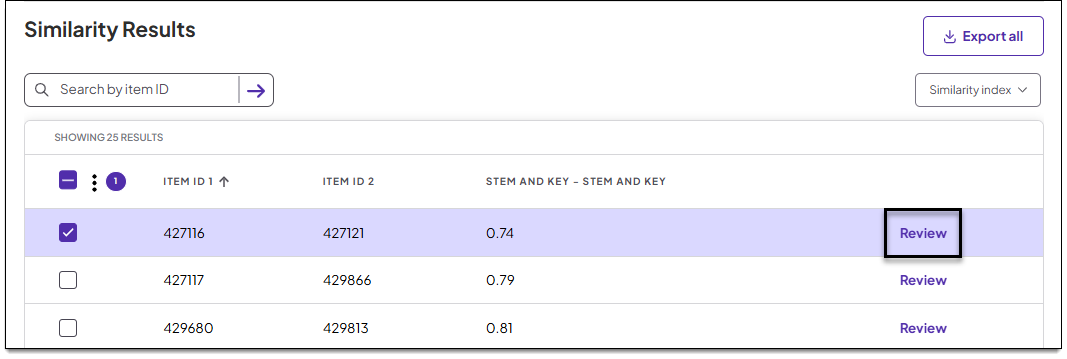
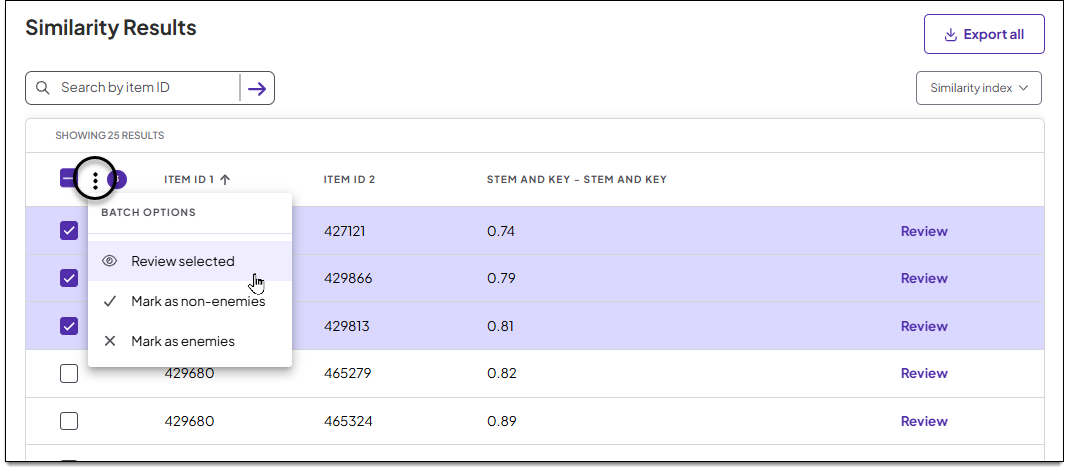
- Select multiple pairs (or the top left checkbox to select all), click
 , and select Review selected.
- Select a single item pair to review and click Review at the end of the row.
- A modal displays each item in a pair side by side for comparison. The similarity index is displayed at the top along with the following criteria to support why the pair was flagged as potential enemies:
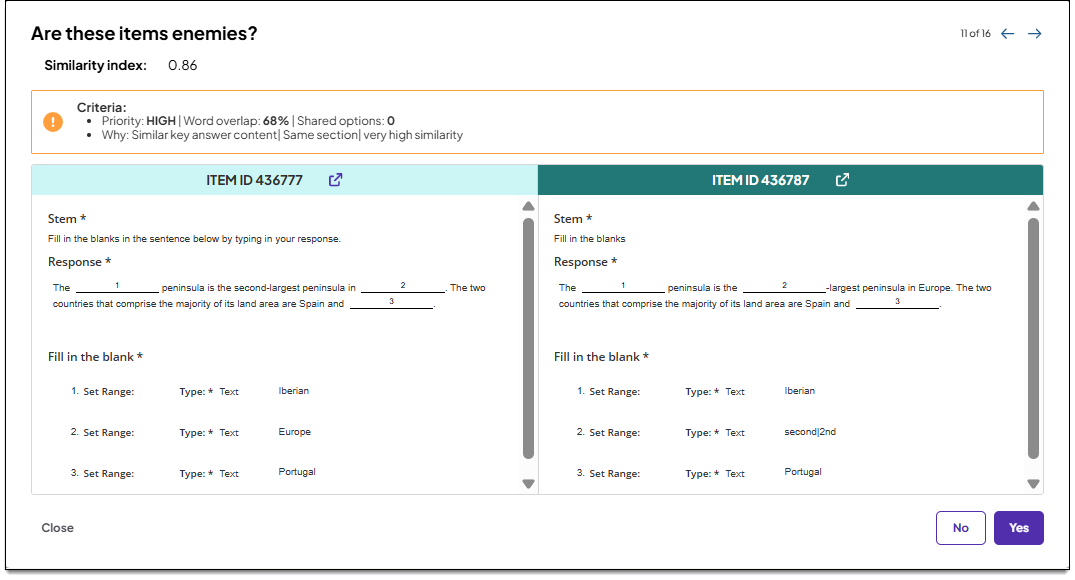
- Priority: indicates an overall value of HIGH, MEDIUM, or LOW based on predefined triggers and detection analysis.
- Word overlap: A percentage (0–100%) representing the overlap between the two items.
- Shared options: The number of normalized option strings shared between the two questions.
- Why: Summarizes any detected 'red flags':
- "Answer leak": One question's stem contains the other's correct answer text.
- "Fuzzy leak": Most of the correct answer's key words appear in the other stem.
- "Shared options": There are multiple identical answer choices across both questions.
- "Word overlap": High percentage of the same words in both stems.
- "Same correct answer": Both questions have the same or semantically similar keyed answer content.
- "Same section": Both questions are categorized in the same blueprint/content area.
- If no red flags are found, you will see "Based on analysis there is a high chance these items are not enemies."
- Review the item content and key (correct answer or answers). Click open in new window
 to launch the item in the item editor.
- Determine whether the items are enemies and choose one of the following actions:
- Click Yes to mark the items as enemies.
- Click No if these items are not enemies.
- If you are unsure, click Close. (Or click the next arrow → in the upper-right corner of the modal if reviewing multiple item pairs.)
- If you choose Yes, the item pair is added to the enemies table in ExamDeveloper (Manage > Import > Enemies). If you choose No, the item pair is added to the Non-enemy database. Learn more about managing enemy status
Search for items in the enemy results
- Enter one or more item IDs in the Search by item ID field. Separate each ID with a comma and a single space. Then click the search arrow →.
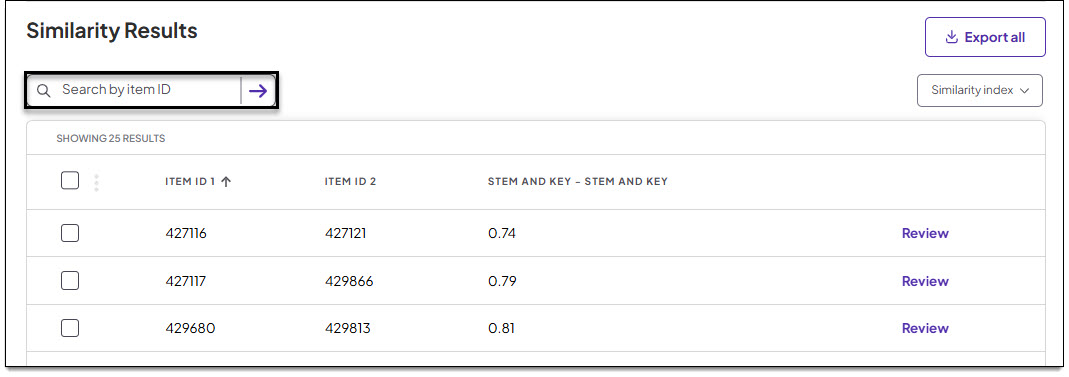
- The results now show only rows that contain the item IDs you specified (either in the Item ID 1 or Item ID 2 column).
- To clear your search, click
 in the search field.
Filter by similarity index
Filter the results list by specific similarity index values. For example, you can select 0.7 and 0.8 to show only item pairs that are flagged as potential enemies based on a similarity index of 0.7 or 0.8.
- Click the Similarity index menu above the results list and select one or more specific index values.
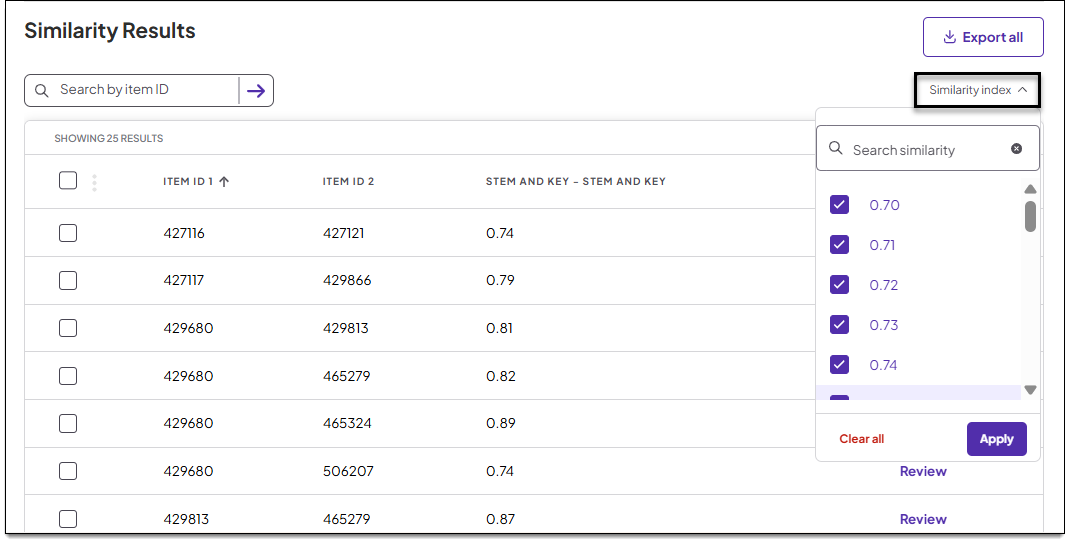
- Click Apply.
- The results list will now show only item pairs that are flagged as potential enemies based on the specific similarity index values you selected.
Sort items by column
Sort the results list in ascending or descending item ID number order, or sort by other column attributes such as item state (State), or author name (Written by).
- Hover over a column header and click the ↑ or ↓ arrows if present.
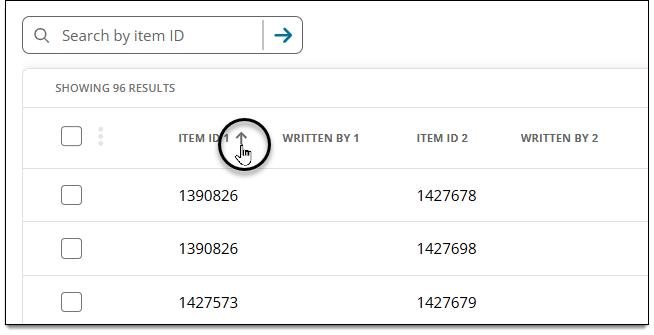
- The list will be sorted in ascending ↑ or descending ↓ order.
- Some columns cannot be sorted.
Export enemy results
- In the upper-right corner of the Similarity Results area, click Export all.
- You are taken to the Queue page. Once the results are ready, a report (.xlsx file) containing the enemy results data will be available for download.
- If an export isn't ready or you want to view it later, you can leave the queue and return to it later. Files are only available for 24 hours from the time they are generated.
- If an export isn't ready or you want to view it later, you can leave the queue and return to it later.
- Click Download once the files are ready.
- The .xlsx file is found in your local Downloads folder.
- The first row of the spreadsheet will display all of the item IDs that were included in the enemy check along with the selected comparison parameters ↑.
Change the default similarity index
|
|
The similarity index is a 0-1 scale based on a comparison of the item stem and key. For example, if items 12345 and 23456 have a similarity index of 0.85, the items are flagged as being 85% similar. The default similarity index is 0.7, meaning item pairs flagged as being 70% or greater in similarity may be returned in the results (based on the defined comparison parameters ↑). Project managers can change this default to another decimal value (up to two decimal places and between 0.10 and 0.99).
- On the Enemy detection page, click
 for the Similarity index in the summary box at the top of the page.
- Type or select a new similarity value.
- The value can include up to two decimal places and must be between 0.10 and 0.99.
- It is recommended to set a value of 0.5 or higher.
- Click Save.
- The new value will be the default for all users in the project unless it is changed again.
Pearson Proprietary and Confidential